Events are easy to setup in GiftRocker. Once created, you will receive a unique link that can be placed on your website or posted on Facebook or any social platform. Customers will use this link to register for your event. Once registered, customers will receive an emailed ticket (that can be added to Passbook). Both the passbook entry and the emailed ticket will have a unique QRCode that can be scanned at your event. To see attendees at any time, click to Reporting / Events on GiftRocker.com.
Here’s how to create an event.
After signing into GiftRocker.com, click the offering tab and then click the green plus graphic on the right side of the page.
![]()
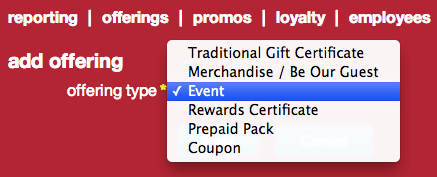
Select Event from the dropdown of all available offering types and click the next button.
Only a few fields are required for an event. Here’s a list of all fields and their purpose:
event name The event name will be displayed on your customer’s tickets and digital tickets. Be short and descriptive. “Rustic Cajun Cooking” is a good name. Since date and time will be displayed with the event, it is not needed in the name.
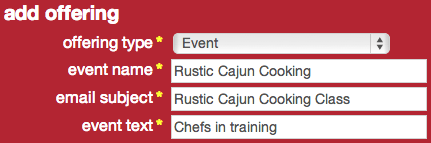 email subject Event tickets will be sent to your customers via email. This field allows you to customize the subject. The default is “Good Things From <your shop>”. You could change this to “Rustic Cajun Cooking Class”.
event text Event text prompts your customers to sign up. The default is “Reserve your spot(s)”. You could also prompt “Chefs in training”.
admin only Checking admin only will restrict this event to your shop’s admins. Managers will not be able to issue. This might be a good idea to limit the clutter in your shop manager’s offering list… but it is bad idea if you expect your managers to sell your events from their iPhone.
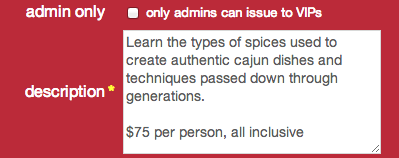 description If your shop is using a content management system (like WordPress), you should be able to add pages to describe events with both words and pictures. From this page, you could link to your GiftRocker event selling page. Likewise, in Facebook you can post a picture with some text and link to your GiftRocker event selling page. Knowing this, it is recommended that you keep your description on your selling page short and to the point. Most likely, your customer is ready to purchase, you don’t want to change their mind! Always add a last sentence that describes the charge. For example, $75 per person, all inclusive.
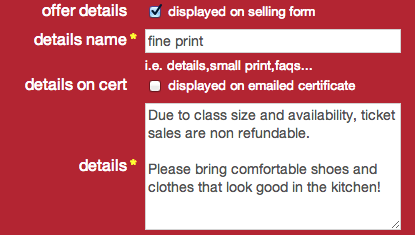 offer details If you want to display small print or for the event, select offer details. This is where you could explain your refund policy or other semi essential information. By selecting, you will be asked to fill out the offer details name and the details themselves. Popular offer details names include “small print”, “refund policy” or “faqs”. The details will show up on the order form as a link below the details. When clicked, they pop up as an overlay.
custom email To override the HTML on the right margin of your emailed ticket, select custom email. This option is rarely used. When off, the right side of the ticket comes from the company profile.
custom message If you need to collect something from your attendees, you could request that here. For example, if you were serving exotic food, you might want to ask your guests if they have any food allergies.
promotion If your event is free, select promotion. You will still want to enter the amount as a perceived value, but it will not be used during registration.
amount Your per ticket price should be entered into the amount field. Shopkeepers are responsible for all tax liabilities. It is recommended that tax is included (and stated in description). If your event is a prix fixe (fixed price) dinner, it is recommended that you include tip for convenience of the customer and your servers.
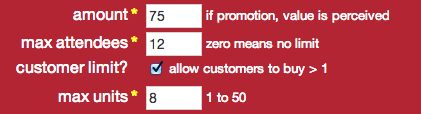 max attendees After you have reached your max attendees, event registration will display a sold out message. This can be customized or just left as the default: “Sold Out! Hope to see you soon.”
customer limit If you would like to restrict the number of tickets purchased by any one person, select customer limit? and set max units to your customer’s limit. This may be needed if you have a high demand event like a book signing for a popular author. Also, if you selected that this is a promotion, you may want to make every attendee register to collect their name and email.

send reminder Your customers will receive their tickets via email immediately following purchase. If you would like to have them receive a reminder the day before the event, select that here.
event coordinator A list of attendees will be sent to the event coordinator the day before the event. Any admin or manager will be able to see attendees on GiftRocker.com under Reporting / Events at any time.
sell end date If you need to know your attendees to allow you to prepare for the event, set the sell end date to give you that time. Once the sell end date is reached, your customers will see a “No longer for sale” message on your order page.
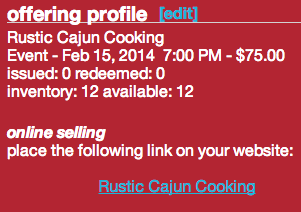 offering profile Once you have saved your event, you will receive your unique selling link on your offering profile. This link can be copied out and placed on your website, Facebook or anywhere online. You also will also receive a QRCode that points to your event. Note that QRCodes should be used only for print ads.
That’s it! Please let us know if there is anything that could help improve these instructions or GiftRocker events in general. Here’s a link to the event used in this example: